Showing posts with label chinese snacks. Show all posts

Monday, February 04, 2013

Pork Jerky/Bak Kwa


My only preparation for CNY this year. I like to think that I have grand plans every year. This year, I confess that it creeped up on me and I found myself short of time to do much.

This has always been one of my favourite snack on CNY- I love the sweet and savoury aspect of it, the meaty texture, the crisp of the slightly charred bits. At every home visit, people would sometimes exchanged stories about how long they queue up to purchase the best bak kwa (My hubby calls it Long Yok). I think Bak Kwa is in hokkien dialect and Long Yok is cantonese.

I bookmarked a few recipes to reference to. My favourite is still Sonia's. I reduced the sugar to 50 grams and think the sweetness is just right. However, I think the meat wasn't pressed thinly enough. While it did have a crisp texture, I felt that it was too thick. Nevertheless, we loved it!

Not without a mini incident...

I was chatting with my grandma on the phone while it was it the oven. I set it to high on grill (which is around 250C), took it out to turn it around and my baking paper caught fire. Lucky for me, hubby was there to save the day, but my grandma found it amusing. I could literally feel her glare on me- just like the first time I cooked in her kitchen. So another lesson learned... concentrate when doing something new!

Using my chopsticks, marinating the meat was easy. Turning it round and round, making sure the meat was all gluey. Thanks to Sonia's pictures, I knew what to look out for. That's the reason why I love blogging. It allowed me to learn more about my own culture, food that I grew up loving- I never wish to forget my roots.

And hopefully, this compensate for my lack of preparation (which is what a good Chinese wife should do) for CNY.

Pork Jerky/Bak Kwa
480 grams of pork mince
50 grams of sugar
1 tablespoon of soy sauce
1/2 tsp of fish sauce
1/2 tsp of chinese wine
1 tablespoon of dark caramel sauce
1/4 tsp of 5 spice powder
1/4 tsp of salt
2 tablespoon of honey

Marinate meat with all ingredients with a pair of chopsticks. Turning it till it turns gluey. Place in fridge for a few hours (mine was around 4 hours).

Pre heat oven to 160C. Prepare baking tray- Sonia didn't use any baking paper. I did. Press meat into tray as thinly as possible. Bake for 15-20 mins. Remove from oven.

Change oven function to grill high or 240C. Snip meat by using a scissors, knife or pizza cutter into pieces. Place it back under the grill. I find that it is charred within 3-4 mins. Turn pieces and place in oven again.

Cool and eat (if you can wait that long).


Photobucket

Monday, July 25, 2011

Quick Fix Egg Tarts


With one piece of puff pastry left in the freezer, I was wondering how can I make use of it. Then Sonia from Nasi Lemak Lover posted her Egg Tart with Puff Pastry and I knew that I have found my answer.

Egg tarts has a special meaning for the two of us. When hubby asked me to be his girl friend, he took me to a lovely quiet spot near a river armed with an egg tart. I was still in university and he just started working. He picked me up after my late classes and told me he was worried that I would be hungry (as I usually am after my classes), hence the egg tart. We were good friends who went for a few dates before that evening and I thought nothing of it. When he did utter the question " I have been thinking, I really enjoy spending time with you and I know you like the time we have together too, so would you be my girlfriend?", I was just slightly surprised.

Two hours of questioning later, I agreed. Most of my friends still give me grieve that I  "tortured" him with my questions in our early stages of dating. While I was initially embarrassed, I was glad we clear up some expectations and thoughts early on, which probably helped us prepare our lives together. If you are wondering, these questions were about his future plans, career pathways, religion and beliefs and seriousness about the relationship. My line of thinking was, I'm not going to waste my time if he isn't serious!

Oh fun times indeed. So while I have not yet master the art of making proper egg tarts yet, I managed to surprise hubby with these little treats when he came home late from work one evening.

Quick Fix Egg Tarts  (makes 8 mini egg tarts)
1 piece of puff pastry cut into 8 pieces
3 eggs
40 grams of sugar
1 tsp vanilla extract
1/4 tsp of vinegar

Whisk eggs, sugar, vanilla and vinegar. Strain it twice. Place pastry into muffin or tart tin. Pour egg mixture into casing. Bake in a preheated 180C oven for around 25-30 minutes till golden brown.


Photobucket

Wednesday, March 30, 2011

Muah Chee


Muah Chee is a childhood favourite snack of mine. It is sticky glutinous flour dough, cooked and then sprinkled with heaps of sesame, peanut sugar toppings. I love the chewiness of the dough, and the crunch of the nuts. It's hard to describe the texture- it is probably closest to tapioca pearls or the bubbles in bubble tea. Except it is alot more sticky!

Muah Chee used to be really popular in night markets and in coffee shops in Singapore. In my recent trip back, I realised that they are not as common-it's still available but only in selected places. I guess one positive to knowing this recipe is that we can continue to make it at home...with the addition of MORE toppings!

I made three batches-with one batch that didn't cook properly. I'm not sure why, since I did exactly the same thing for all 3 batches! Oh well, it isn't meant to be. 

I took this recipe from Lily, Little Teochew and Little Corner of Mine. These ladies inspire me to make food close to my heart!

Muah Chee
1 cup glutinous rice flour
2 tsp sugar
2 tbsp thick coconut milk
1 tbsp cooking oil
150 ml water

1 tsp of olive oil

Topping
1 cup of roasted granulated peanuts
1/4 cup of  sugar
2-3 tsp of sesame seeds


Combine glutinous rice flour, sugar, coconut milk, oil and water in a microwave safe bowl. Stir till it becomes like a thick dough. Microwave for 1 min, mix, then another 1 min. 


Pulse all toppings in your food processor. I made enough for 2 batches of muah chee. 


Snip the dough while it is warm, tossing it with the topping. Eat!

Photobucket

Sunday, March 20, 2011

Cashew Nut Cookies 2


Oh 3 months went so quickly and granny is back in Singapore again. The house certainly feels empty and different without her presence. Nevertheless, I know I will be back in Singapore in a few months to see her and my family and love ones :)

A few people commented that I am very close to my grandmother. Granny is my maternal grandma. She looked after me since I was an infant, and I do have a very close attachment to her. My parents worked really hard to provide for the family, and it was really a blessing that a close family member was able to care for me when I was a child. I think for my mother, it was probably a relief that someone she can trust took care of her daughter. I  have a close relationship with my mother too, and people always comment that we look alike. In fact, a work colleague once commented to me that she wish I will age as gracefully as my mother and grandmother!

For my hubby, he laughed often when he goes shopping with us. He said it is often a abit of a sight to see 3 generations shopping since we will always head to the same department together- the shoes. Yes we love our shoes!

Another friend also said that she thinks it is amazing how my hubby wouldn't mind granny staying with us for an extended period of time-and even have the design of our new home with her in mind. In all honesty, I didn't even think that would be a problem! What a considerate wife I am. When I asked him that, he said that he does not have the privilege of spending time with his grandmothers anymore as they have passed on and therefore, thinks of granny as his own. I swear that granny adores him and would often cooks what he likes- walking to the nearest oriental store just to purchase his favourite bittergourd vegetable. They banter and tease each other in broken English and Cantonese-which often makes me laugh till I stitch while they stare at me waiting for me to translate what they were saying.

Ahh..good times indeed.


Turns out that granny loves Cashew Nut Cookies just as much as my hubby does. I have no idea where I took this recipe from, but it has a more crumbier and melt in your mouth texture. Both of them prefer this recipe than the last one probably because it does have a more fragrant smell to it. It does crumbles very easier so take extra care when storing them-or else you ended up with more crumbs in your mouth than cookies in your jar.

Unless that's the way u want it. ;)

Oh oh does anyone know a traditional Hup Tou Sou recipe? I really want to conquer my fear of making them!!


Cashew Nut Cookies 2 (makes around 16 cookies)
90 grams flour
1/2 tsp baking soda
1/2 tsp baking powder
pinch salt
40 grams confectionery sugar
1/2 cup roasted and ground walnuts
80ml of olive oil (but u can use peanut oil too)

Extra cashew nuts for garnishing.

Egg wash- egg yolk whisked

Preheat oven 180C. Line baking tray with baking paper.

Sieve flour, baking powder, soda, salt and sugar together. Fold in ground walnuts and oil. Knead with your hands into a soft dough. Using a teaspoon, spoon dough and roll into a ball. Flatten and place on tray. Place one cashew nut onto dough. Bake for 15 minutes till golden.


Photobucket

Sunday, February 27, 2011

Cashew Nut Cookies 1

A few years ago, just before hubby and I got married, we made our annual trip back to his hometown in Malaysia. There, my mother-in-law would often have a shoebox filled with newspaper cuttings reserved for us. Occasionally, she will call me down to her kitchen and show me more newspaper clippings, usually recipes that she wanted to try but does not have the time or opportunity and would then stuff the clippings in one of her drawers.

I recall that she showed me a recipe for Hup Tow Sou before or a type of melt in your mouth cashew nut cookies. She reminded me that hubby's favourite cookie is that, and she has reserved the recipe in the event that one day she would be able to make it for him. She handed the recipe to me and asked me to give it a go, given that it is not often he comes home.

Now, I did try that recipe, twice in fact and I failed sooo miserably with it. I don't even recall taking any photos or documenting it-probably due to it being such a failure (and u guys know I am not shy with documenting my challenges in baking) that it was too traumatic for me to remember it. Or perhaps, not wanting my mother in law to know that I didn't succeed! Not that she would mind I am sure, but the self talk of being a new wife, and the bruised ego of not being even able to make my hubby's favourite childhood cookie clouded over me for a while.

Exaggeration aside, I never did try attempting any other form of cashew nut cookies since then. Silly me really, because my mouth waters when Little Corner's and Lily's new year goodies posts came to mind. This time, I decided to go with a recipe from a book that I have other success from. It wasn't the traditional Hup Tow Sou but it has a lovely crisp cashew nut flavour, with a melt in your mouth texture. I would say this has a more crisp texture as well.

You can imagine the relief that wash over me when the batch of cookies came out looking normal. ;P

Cashew Nut Cookies (makes around 50) 
250 grams butter
180 grams icing sugar
400 grams plain flour
1 tsp baking powder 
180 grams of ground cashew nuts (using nuts that were roasted)
1 egg yolk
1 tsp vanilla essence
100 grams of whole cashew nuts for garnishing

Egg wash- 1 egg yolk ( I used the whole egg)

Preheat oven to 160C. Line 2 or 3 baking trays with baking paper.

Sift plain flour and baking powder. In another bowl, cream butter and icing sugar together. Add in the egg yolk and vanilla essence. Flour flour and ground cashew nuts to batter. Mix well til it forms a dough. Shape dough in little balls using a tsp. Alternatively, you can roll it out and use a cookie cutter. Brush dough with egg wash and press a cashew nut on top. Bake for 20-25 mins.


Photobucket

Sunday, February 20, 2011

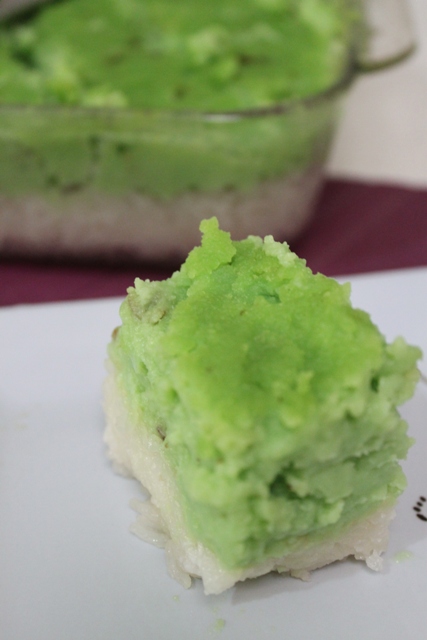
Baked Pandan and Coconut Milk Cake

A very belated post. Late January, it was hubby and granny's birthday. Turns out that this year, Granny's Chinese birthday (according to the lunar calender) is the same as hubby's English birthday!


On the day itself, hubby bought his own birthday cake. I felt so bad.. but work means that I did not get home till late that day. It was a sweet day though as granny waited till both hubby and I are back, staying up late to cut her birthday cake (Sharing with hubby of course). I rarely have the chance to celebrate granny's birthday-given that I'm not in Singapore often. I think she senses it too, that despite my working hours, we sincerely want to spend it with her.


To make it up, I decided to make a cake that I thought will make both of them happy. It has to be something slightly different since granny isn't a fan of sweet creamy cakes. I decided to adapt a Nyonya recipe from one of Andrew Kow's cookbook "Nyonya Kuih with Passion". It has coconut- so I know it will be a winner with hubby.

While I was making it, granny commented that it is unusual to be cooking the batter on the stove before baking it. Indeed. The batter will become very thick-like when one is making yam or radish cake.

The result is.... a happy granny and hubby. =)


Baked Pandan and Coconut Milk Cake
200 grams Rice Flour
80 grams mung bean flour
150 grams of sugar (reduced from 300 grams)
1400 ml of coconut milk (I used 1000 ml of coconut milk and 200 coconut cream)
20 grams of sago powder (omitted as I dont have it!)
pandan essence- around 2 tsp

Oil a square baking tin. Pre heat oven 180C.

Place all ingredients into a pot. Mix well and cook using medium heat. Keep stirring till the batter becomes thick. Bake for 30 minutes till it becomes golden brown on the top. Leave to cool. Cut into pieces and serve.


Photobucket

Thursday, February 10, 2011

Grass Jelly Dessert


Growing up in Singapore, one of my favourite drink in the markets is Chin Chow or Grass Jelly. It's really a herb that is made into a jelly form and has "cooling" properties to cool down on a hot day.


Perth is going through a pretty hot summer this year, with 38/40C days. Sometimes, I feel like I'm being "cooked" underneath the hot sun.

Although we can purchase cans of grass jelly drinks, I noticed a packet of grass jelly powder that can be cooked easier on the stove top. It sets and becomes big blob of jelly-similar to what we can buy in supermarkets in Singapore. I love to have them in large cubes and eat it like a dessert rather than it being a drink.

Another alternative that I have yet to try-and maybe I could during winter, is to make this into a warm dessert. A Taiwanese eatery in Perth sells this with red bean and tapioca pearls. Ahhh.. warm desserts rocks as well.

In the meantime, granny taught me how to make a cool syrup using pandan leaves, and a mixture of rock and brown sugar.


Grass Jelly Dessert(Serves 5-6)
1 packet of Grass Jelly powder
1 can of logans

Follow instructions on packet. Set the grass jelly.

Syrup
500 ml of water
1 cup of brown sugar
1/2 cup of rock sugar
3-4 pandan leaves tie in a knot

Simmer ingredients till it becomes slightly thick. Around 10 serves.

Spoon grass jelly in bowls, Add logans and syrup. Serve cold. If you want, you can use the syrup from the logan can instead of simmering one yourself =)


Photobucket

Friday, November 19, 2010

Cheats Pandan Cake

Oh so I resorted to using a cake mix for Pandan chiffon cake. One day I will have the guts to make it from scratch but I argue that we all have to start somewhere.....  This is more of an ease and curiosity since I have noticed the packet in our local oriental store for years.


The brand that I used was Primamix and surprisingly, the final result was close but not a winner yet. It does have a pandan taste but it lacks the chiffon or soft cottony feel of the cake. It could be my fault as well as I do not owe a chiffon cake tin-just a fluted one.  Hubby was satisfied though and best of all, it was cheaper than getting the whole cake. All I needed was 6 eggs and a cake mix....

Monday, May 24, 2010

Loh Mai Kai (Glutinous Soya Pork Rice)


I have raved about this blog before and still continue to draw ideas from this brilliant home cook. When I saw Little Corner's lazy version of this very popular hawker dish, I decided to give it a go. Can you believe that I have not touched this dish for years! (Approx 8 years probably). One reason is because of the oil that goes with this dish. In hawker centre, I can taste the oil sipping through and being very weight conscious, I couldnt bear to take this dish when I can have other options to try (like my favourite Yong Tou Fu!).


Thankfully, home made version means I can adjust oil and seasoning accordingly. It was super easy and while I was in the zone plating this up, I messed up my Kueh Salat (previous post). Oh well, one win and the other one... to try again!


Loh Mai Kai (Glutinous Soya Pork Rice) -Chicken should be used! But I had pork so I used that instead.. 
1 cup of Glutinous Rice  (i did soak it for a few hours) wash, water level as normal and cook in rice cooker
 200 grams of pork sliced marinated in
2 tablespoon of oyster sauce
1 tablespoon of soya
1 tablespoon of dark (I might reduce this next time)
heaps of pepper

garlic
Chinese mushrooms
1 chinese cured sausage (Lup cheong) sliced 

Marinate Pork. While rice is cooking, saute garlic and add lup cheong. When it sizzles, add pork and sauces. Add around 1/4 water if too dry. Taste for seasoning. Add chinese mushrooms. Set mixture aside when cooked.

When rice is nearly done, add in the same portion of seasoning as you would for the pork. Stir well.

Spoon cooked rice into a small bowl. Compact it. Place pork or chicken slices, mushrooms  and lup cheong on top. Press to compact. Place a plate on top of the bowl, turn it over, give it a light tap and remove bowl. Tadah... Loh Mai Kai!

Saturday, May 22, 2010

Failed Attempt of Kueh Salat

So for a few days, I whispered to myself daily...."In order to appreciate positives, we have to embrace the negatives. When there is failure, then we appreciate success."


As part of making Kueh Salat, not only do we need to steam the glutinous rice, the custard topping needs to be stirred constantly till it becomes like a creamy looking thick custard. Pour it into the glass pyrex pan, steam it and da-duh, beautiful looking kueh.

Of course, I was distracted (haha, sorry was going through abit of a stress week that particular week!),as I was also making"Lo Mai Kai" (Steam Glutinous Rice with Soya Pork and Mushrooms) at around the same time frame. I was trying to make use of my packet of glutinous rice as much as possible. Not that we are going to finish everything but just to share it with family and friends.


So the custard became lumpy and overcooked just as I glance over to check. It's too late though. Can't be salvaged.. and the lumpy custard was poured into the tray... steamed.. My heart goes out to the custard! Poor custard, it wasn't meant to be! 

back to the drawing board with this one....

Monday, March 22, 2010

Baked Nien Gao

So this is an awfully late post- given that CNY was over more than one month ago! To add to the lateness, I spotted this recipe in 2008 by Little Corner. Two years later, I finally digged out the recipe that I printed and saved in my folder. It was one recipe that I kicked myself for not trying earlier- because it is dead easy and certainly a good talking point when we bought it to celebratory gatherings.


One batch certainly yields enough for heaps and heaps of people. I split mine into two serves and brought it to TWO gatherings. Talk about saving time and effort huh? ;p

My mother-in-law asked me over the phone what did I bring to one of our family gatherings (My father in law's cousins). I proudly said "Nien Gao!" which she replied "now that is an interesting dish to bring!" Phew.. I thought I nearly failed the "daughter in law test" given that we regretfully did not manage to return to Malaysia for our first CNY as a married couple. In fact, I felt like I have failed the "best granddaughter" test too when I had to tell my grandmother the same thing in Singapore. Though they understand, one cannot deny the pain that I felt when I heard the disappointment in our parents and grandmother's voices.

So hopefully we will be back next year!

ps- recipe from Lin.

Sunday, February 14, 2010

Happy Tiger Year!

Gong Xi Fai Cai!

Happy Chinese New Year everyone! What a lovely year it was and now we have approached the Tiger year.


I kept this recipe for more than 2 years now. Finally this year, a chance to try it out! Golden Pineapple Tarts.

Sure enough, it lives up to its name of being hard work. Yet every second was worth it. The night before, I cooked the pineapple filling. Soon after, the kitchen was filled with lovely scents of cinnamon and star anise.

On Friday, I quickly tapped away on my computer, completing all my paperwork before 2.30pm! SCORE! Time go home and make the dough.

Truth be told, the dough wasn't difficult to make. It was, however, encasing the pineapple filling into the dough that was tricky. Mine started out huge, then it became slightly more manageable.


Finally, an unglam picture of the hubby. It was the moment of truth when he bite into it.


He was kind and finished every bite of it. I found the dough/short bread to be too thick and wish I could have practice more to put more filling in it. Having said that, we both agreed that the filling was lovely and wasn't as sweet as commercially bought ones.

Thanks to the inspirations of Rasa Malaysia and Fresh from the Oven. It is the generosity of such great food bloggers who shared their secrets and kitchen knowledge that allow a novice like me to learn so much.

Here is wishing everyone a Prosperous New Year filled with happiness and joy. Not forgetting the most important one GOOD HEALTH!
HUAT AH!

Monday, January 18, 2010

Simple Okonomiyaki

Growing up, watching "Fang Tai" cook in our television screen is the norm. What I used to be amazed, was the amount of oil she seemed to have on hand. There was always a wok filled with oil ready for deep frying- and how nearly EVERY dish required deep frying!

Mum and I went shopping one day at OG (2 years ago maybe?), and I spotted "Fang Tai"'s  Quick and Easy Meals cookbook. I flipped through and surprise surprise, the dishes featured were alot healthier than what was before.

This simple Okonomiyaki caught my attention because it is what it says, simple. I never did associated the word simple with Okonomiyaki, so it was nice to know that it can be replicated in the small kitchen.

Funny enough, in the cooking instructions, it says add water but now where did it state how much water to add to the batter. I went with my "gut feeling" and added it till it becomes a semi thick batter that we can pour easily using a ladle.


Simple Okonomiyaki 
3/4 cup of flour
1/2 cabbage shredded
mushrooms
1 packet of ham
1/2 tsp baking powder
3/4 tbsp oil
around 1 cup of water
Teriyaki sauce
Mayo

Salt and pepper

Sieve flour and baking powder, add water and mix into batter. Put oil and seasoning. Mix well and set aside for 20 mins. Fold all veges and ham in batter.
Heat oil in pan. pour small ladle of batter into pan, flip after around 5 mins. Serve with teriyaki sauce and mayo!

Sunday, February 22, 2009

Char Siew Bao


Since getting a bread maker, my mind wanders to all the possibilities one can do with it. One of life little luxuries is to wake up to the scent of fresh bread...but given it makes dough, I begin to explore the option of making other dough food items with it as well.

My first attempt outside of break making is BAO- or a chinese dough wrapped around some filling. With my grandmother here a couple of weeks ago, we began a grand-daughter and grandma project- Char Siew Bao making!


She of course, decided to go with cooking the filling. First we bought some char siew, and she choppped it up into small pieces, frying it with some oyster sauce and sugar.

On my part, I followed instructions from my Christmas present... a book titled "Food around the world".

And of course, in true blue Daphne fashion, things went wrong.

1) I added too much yeast. And our bao dough BALLONED into a HUGE mess! U should see the bread machine!

2) I did not add enough salt.. Yup! The dough was a little tasteless.


Nevertheless, my grandmother was braved enough to take a few bites..and then say...

"Not bad! The filling is good!"

DOH!

Thursday, August 14, 2008

Oven Baked Curry Puffs


I have been eying this recipe for ages. Curry puffs are one of my favorite snacks as a kid-in fact, my favorite part is the egg and the crisp edges. These treats are usually deep fried and are probably not the most healthy snack around, but arguably one that is the hardest to deny.

The first time I read the recipe, I thought it was waaaay too much work and procrastinated attempting them. The "one day I will make these" eventually turned into 3 years.


Because these curry puffs weren't deep fried, the texture of the pastry wasn't the same. Nevertheless, it had a slight melt in your mouth texture which I found surprising. The pastry was rather thin as well and you get a generous mouthful of filling. I did not follow the recipe for the filling as the original recipe required coconut milk which I was reluctant to use since I froze some of the remaining puffs.


Oven Baked Curry Puffs (makes 25)

Pastry
500 grams of plain flour
1 egg
150 grams of butter
50 ml iced water
pinch of salt
1 tsp of vanilla essence

Filling
3 potatoes chopped finely
1 onion chopped finely
3-4 tablespoon of your favourite curry paste
2-3 tsp of curry powder
1 tsp of minced ginger and garlic
pinch of salt

Egg wash
1 beaten egg

Pastry
1) Whisk egg till smooth. Add vanilla essence and salt.
2) Rub butter to flour till it resembles breadcrumbs.
3) Add egg mixture and iced water and mixed with both hands to form dough. Cover with damp cloth and chill for 1 hr.

Filling
4) Meanwhile cook potatoes in a pot of salted boiling water till just done. Drain.
5)Heat some oil in a seperate pan and saute the onion, ginger and garlic. Fry curry paste as well. Add potatoes and curry powder and cook throughly. Season if needed.
6) Set aside and cool.

Wrap
7) Preheat oven to 150C
8) Dust board with flour. Flatten a piece of dough to a thin disk. Place 1tbsp of filling at the centre and seal edges. Either use your fingers to fold wavy fringe or a fork.
9) Place puffs on baking tray. Brush with egg wash. Bake for 20-25 minutes till golden brown. Cool and serve.


I was lazy and used a fork to do the edges rather than pleating them. I wouldn't say they looked perfect but I'm glad I finally attempted them after 3 years!! And so, I have the privilege of bringing this dish to Dhanggit's perfect party dishes blog event. Happy first birthday Mayumi!!
Related Posts Plugin for WordPress, Blogger...